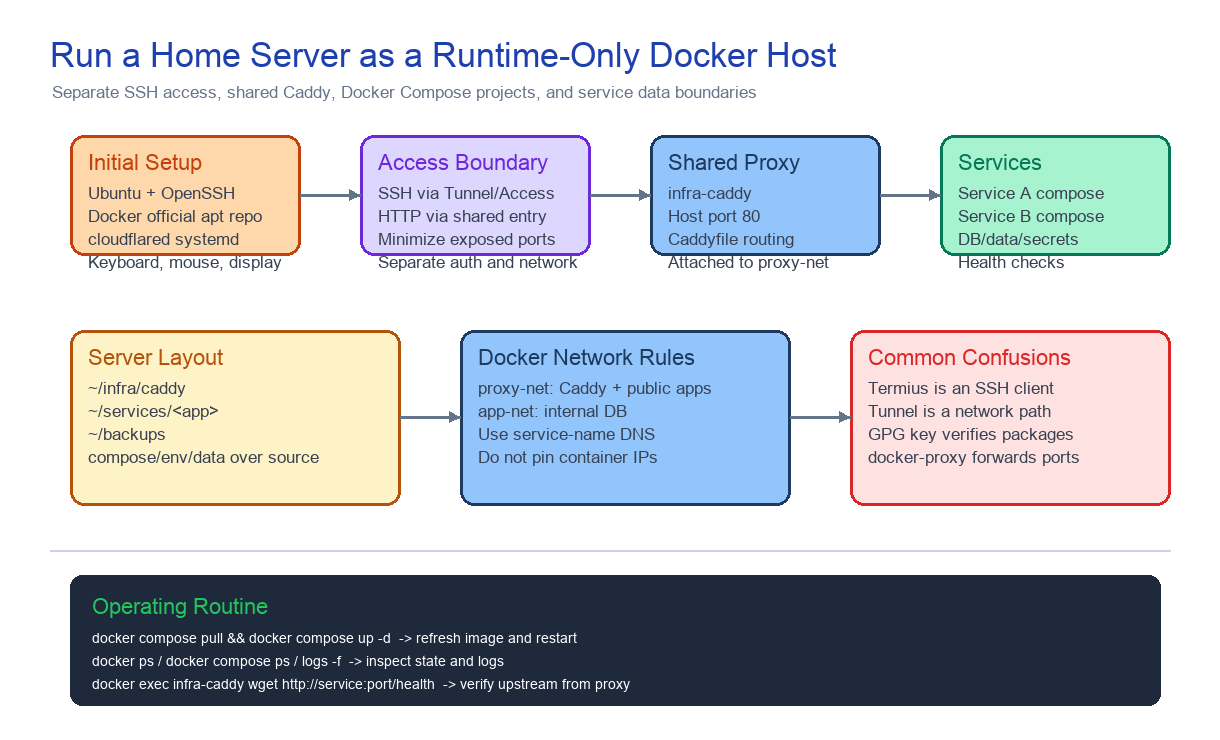
The hard part of this home-server setup was not installing Ubuntu or Docker. It was deciding the operational boundaries first. How should SSH access work? Where should HTTP requests enter? Which Docker networks should each app join? Should the server hold source code or only runtime images? Those decisions mattered more than the package installs.
This note is a record of the questions that were easy to mix up during setup, and the operating model I would recommend to someone building a first home server now.
Summary
- Problem: At first, Cloudflare Tunnel, SSH, Termius, Docker, Caddy, and Docker Compose all looked like overlapping tools.
- Decision: I treated the home server as a runtime machine, not a development machine, and separated access boundaries from service boundaries.
- Chosen structure: SSH access is handled through a separate boundary such as Cloudflare Tunnel or Access, while public HTTP traffic enters through a shared Caddy on
:80and routes to services on a shared Dockerproxy-net. - Lesson: Once you need to run more than one service, a single shared reverse proxy and per-app Compose projects are much easier to operate than opening ports for every app.
Context
The first things I prepared were a USB installer, Ethernet, and an Ubuntu image. That immediately triggered a pile of questions.
- If I use Cloudflare Tunnel, do I still need a public IP or port forwarding?
- Do I really need a wired keyboard and mouse?
- Why should SSH go through Cloudflare?
- Does Termius replace Cloudflare Tunnel?
- Why do Docker docs make me add a GPG key and an apt repository?
- If I run several services, do I need a separate Caddy per service?
The Principles I Picked First
If you want to run a home server like a server, you need clear layers.
Access layer: SSH, Cloudflare Tunnel, physical console
Ingress layer: shared Caddy
Service layer: one docker compose project per app
Data layer: volumes, data, secrets, databases
Deploy layer: GHCR image pull, docker compose up
Once you split it that way, "something is broken" becomes a smaller question. Is SSH broken? Is Cloudflare failing to reach origin? Is Caddy missing the Host match? Is Docker DNS unable to resolve the service name? Is the app health check failing? Each layer has its own failure mode.
Hardware and First Boot
Using Cloudflare Tunnel does not remove the need for a physical console. Tunnel and SSH only help after the server has booted correctly and joined the network.
For the first setup, I still needed:
- a USB installer
- a wired keyboard and mouse
- an HDMI monitor or TV
- Ethernet
- optionally, a UPS
If the server does not boot or loses network, neither SSH nor Tunnel will help. That is when you need BIOS access, the local console, and boot logs.
The First Commands After Ubuntu Install
During the Ubuntu install, it is worth enabling the OpenSSH server. After the install finishes, check the LAN IP from the physical console, then move to the laptop you actually work from.
ip a
ssh user@192.168.x.x
The next step is base packages and Docker. I followed the official Docker apt repository flow instead of ad hoc install scripts.
sudo apt update
sudo apt install -y ca-certificates curl
sudo install -m 0755 -d /etc/apt/keyrings
sudo curl -fsSL https://download.docker.com/linux/ubuntu/gpg \
  -o /etc/apt/keyrings/docker.asc
sudo chmod a+r /etc/apt/keyrings/docker.asc

sudo tee /etc/apt/sources.list.d/docker.sources <<EOF
Types: deb
URIs: https://download.docker.com/linux/ubuntu
Suites: $(. /etc/os-release && echo "${UBUNTU_CODENAME:-$VERSION_CODENAME}")
Components: stable
Architectures: $(dpkg --print-architecture)
Signed-By: /etc/apt/keyrings/docker.asc
EOF

sudo apt update
sudo apt install -y docker-ce docker-ce-cli containerd.io docker-buildx-plugin docker-compose-plugin
At first the GPG-key step looked like ceremony. It is not. It is the point where apt verifies that the Docker packages on this bare-metal runtime host were signed by Docker.
Verification is simple:
docker --version
docker compose version
docker run --rm hello-world
If you want to use docker without sudo, you can add your user to the docker group:
sudo usermod -aG docker "$USER"
newgrp docker
But that is effectively Docker daemon control, so on an operations host it is worth being deliberate about who gets that access.
Cloudflare Tunnel and SSH
One of the first confusing questions was whether Termius makes Cloudflare Tunnel unnecessary. They are not the same kind of tool.
- Termius is an SSH client.
- Cloudflare Tunnel and Access define the network path and access policy.
Termius makes ssh easier to use. Cloudflare Tunnel changes how the server becomes reachable from outside.
In Cloudflare's documented model, Tunnel creates an outbound-only connection from origin to the Cloudflare network. That means the server does not need a directly routable public IP to expose resources through Cloudflare. SSH is also a documented use case, with options such as client-side cloudflared, browser-rendered SSH, and Access for Infrastructure.
The initial flow looked roughly like this:
cloudflared tunnel login
cloudflared tunnel create home-server
cloudflared tunnel route dns home-server ssh.example.com
sudo cloudflared service install
sudo systemctl enable cloudflared
sudo systemctl start cloudflared
In operations, I run cloudflared as a systemd service:
cloudflared.service
ExecStart=/usr/bin/cloudflared --no-autoupdate --config /etc/cloudflared/config.yml tunnel run
An SSH ingress can look like this:
ingress:
  - hostname: ssh.example.com
    service: ssh://localhost:22
  - service: http_status:404
The important point is that Cloudflare Tunnel does not replace the SSH daemon. The server still runs SSH on localhost:22 or another internal interface, and Tunnel adds an access boundary in front of it. Your actual exposure then depends on the Cloudflare route, Access policy, and local network rules.
Also, creating the Tunnel DNS route is not the end of the SSH design. If you use Cloudflare Access, you still need to choose who can connect, how they authenticate, and whether they use a local cloudflared client or browser-based SSH.
Put Public HTTP Behind One Shared Caddy
The easiest mistake with multiple services is opening host ports for each app:
service A -> 8000
service B -> 8001
service C -> 3000
service D -> 5000
That quickly makes it unclear which ports should be public, which domain maps to which service, and where TLS, CORS, and logs should be handled.
The structure I wanted was simpler:
Cloudflare or client
  -> host :80
  -> infra-caddy
  -> Docker proxy network
  -> service containers
If Cloudflare Tunnel fronts the public HTTP traffic too, its ingress can route app.example.com -> http://localhost:80, and the shared Caddy can handle the Host-based dispatch. If you use Cloudflare DNS proxy and router port forwarding instead, the origin-side pattern is still the same, but the TLS and forwarding settings become a different concern. Tunnel-origin HTTP entrypoints and DNS-proxied origin TLS should not be treated as the same problem.
The shared Caddy Compose lives in its own infra directory and exposes only host :80:
services:
  caddy:
    image: caddy:2
    container_name: infra-caddy
    ports:
      - "80:80"
    volumes:
      - ./Caddyfile:/etc/caddy/Caddyfile:ro
    networks:
      - proxy-net
    restart: unless-stopped

networks:
  proxy-net:
    external: true
The Caddyfile receives every request on :80 and branches by Host:
:80 {
  @service-a host app-a.example.com
  handle @service-a {
    reverse_proxy service-a:8000
  }

  @service-b host app-b.example.com
  handle @service-b {
    reverse_proxy service-b:3000
  }

  respond 404
}
The important detail is that the upstreams are Docker service names, not IPs.
Use Docker Networks as Service Boundaries
Docker Compose creates project-scoped bridge networks by default, and containers on the same network can resolve each other by service name. You can also create custom networks shared across Compose projects.
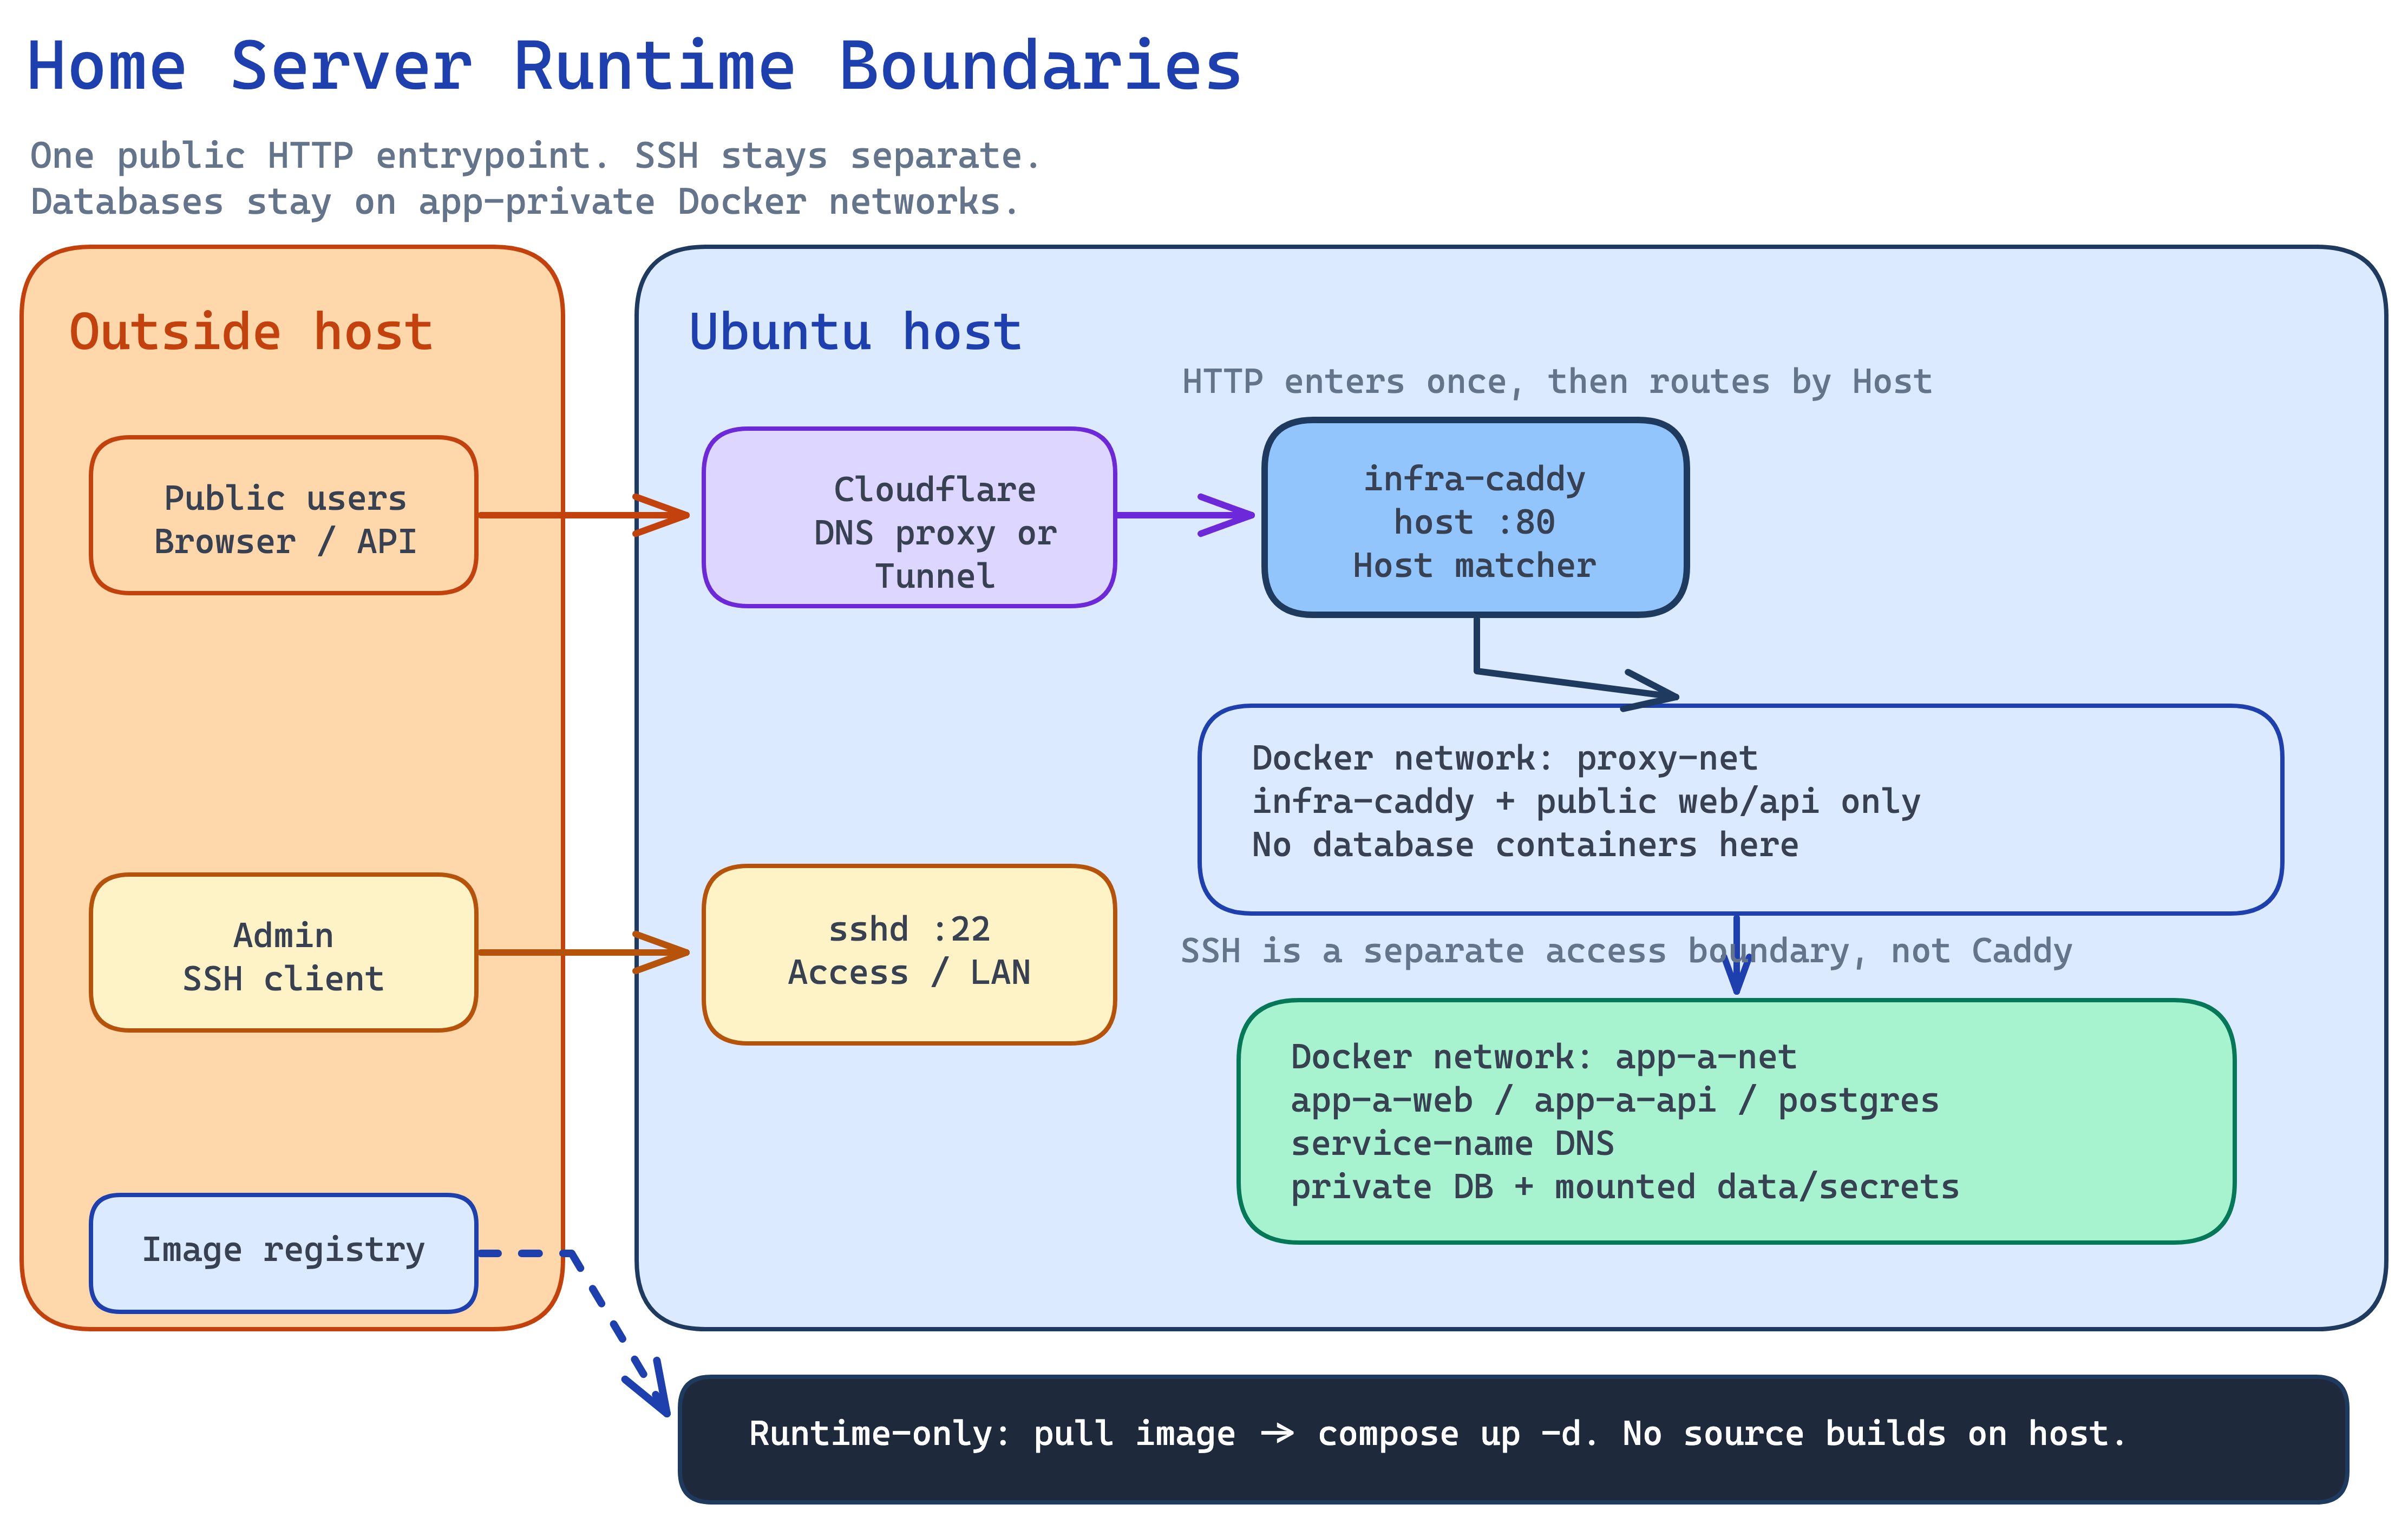
The key point in this diagram is that infra-caddy is the only container directly attached to the public ingress path. Public-facing app containers can join both proxy-net and their own app network. Databases and private state stay on the app-local network only.
That produces a topology like this:
proxy-net
  infra-caddy
  app-a-web
  app-a-api
  app-b-api

app-a-net
  app-a-web
  app-a-api
  postgres
A concrete example looks like this:
services:
  api:
    image: ghcr.io/example/app-api:latest
    env_file:
      - .env
    volumes:
      - ./data:/data
    networks:
      - proxy-net
      - app-net
    restart: unless-stopped

  postgres:
    image: postgres:16-alpine
    volumes:
      - postgres_data:/var/lib/postgresql/data
    networks:
      - app-net
    healthcheck:
      test: ["CMD-SHELL", "pg_isready -U $POSTGRES_USER -d $POSTGRES_DB"]

networks:
  proxy-net:
    external: true
  app-net:
    driver: bridge

volumes:
  postgres_data:
In that setup, Caddy can reach api:8000, but the database is not exposed on proxy-net. If you really need a host-side database port for administration, binding it to loopback only is safer than exposing it publicly:
127.0.0.1:5432 -> container 5432Treat the Server as Runtime-Only
The server is where images run, not where source code gets developed.It is tempting to git clone repositories directly on the server, build Dockerfiles there, and manage node_modules or Python dependencies by hand. That gets messy fast once you have several services.
I wanted the runtime host to look more like this:
~/infra/
  caddy/
    docker-compose.yml
    Caddyfile

~/services/
  app-a/
    docker-compose.yml
    .env
    data/
    secrets/

  app-b/
    docker-compose.yml
    .env
    data/

~/backups/
Application images come from a registry such as GHCR:
cd ~/services/app-a
docker compose pull
docker compose up -d
docker compose ps
docker compose logs -f
That gives you a standard runtime loop:
docker compose pulldocker compose up -ddocker compose psdocker compose logs -fdocker restart infra-caddydocker exec infra-caddy wget http://service:port/health
The benefit is that deployment becomes an image-and-compose problem, not an on-host build problem.
The Parts That Were Easy to Mix Up
Cloudflare Tunnel and HTTP Reverse Proxy Are Not the Same Thing
Tunnel creates the path between Cloudflare and origin. Caddy is the reverse proxy inside origin that splits requests by Host, path, and upstream. If you blur those together, Tunnel problems and Caddy routing problems get mixed into one vague "Cloudflare issue."
Termius Is Not the Network Path
Termius is an SSH client. Whether the underlying route is a public IP, a VPN, Cloudflare Tunnel, or Zero Trust Access, Termius is the app used on top of that path.
Docker GPG Setup Is a Trust Boundary
Registering Docker's keyring and apt source is not just annoying ceremony. It is the point where package signatures get verified. On a bare-metal runtime host, that is more defensible than curl | sh.
docker-proxy Is Not Your Web Server
If ss -lntp shows docker-proxy, that only proves Docker is forwarding a host port to a container port. It does not prove that the service behind it is actually listening or healthy.
Caddy Is the Fastest Narrowing Point
When something breaks in the browser, I do not jump straight to blaming the app. Checking upstreams from inside the Caddy container quickly separates Docker network issues from application issues:
docker exec infra-caddy wget -qO- http://app-api:8000/healthIf that fails, the problem is already inside origin. If it succeeds, the next step is Host routing, CORS, or Cloudflare settings.
The Order I Would Follow Next Time
If I had to set this up again from scratch, I would use this sequence:
- Enable the OpenSSH server during Ubuntu install.
- Use a wired keyboard, mouse, and monitor for first boot and LAN IP verification.
- SSH from the laptop over the local network.
- Install Docker through the official apt repository flow.
- Verify runtime basics with
docker run hello-worldanddocker compose version. - Create a shared Docker network such as
proxy-net. - Create a shared Caddy Compose under
~/infra/caddyand expose only host:80. - Decide explicitly whether origin entry is via Cloudflare Tunnel or DNS/proxy + port forwarding.
- Manage SSH access through a separate boundary such as Cloudflare Access, Tunnel, or a VPN.
- Keep each app under
~/services/<app>with its own Compose, env, data, and secrets. - Attach only public-facing app containers to
proxy-net; keep databases on internal app networks. - Standardize deployment as
docker compose pull && docker compose up -d. - During incidents, check
docker compose ps,docker logs, anddocker exec infra-caddy wget .../healthin that order.
The core idea is to start with a structure that can support several services, not just one throwaway app.
What I Learned
Over time, home-server quality depends on how clearly you separate boundaries:
- the SSH access boundary
- the HTTP ingress boundary
- the Docker network boundary
- the app data and secret boundary
- the build/runtime boundary
If those are separated up front, running several services on one machine stays understandable. If everything opens host ports, every repo gets cloned directly on the server, and Caddy, apps, and databases all share the same network without intent, even a small incident becomes harder to localize.
A home server can be operated like a small cloud. The difference is that you have to treat it like a runtime machine, not like a laptop with some services on it.
This also made the cost of cloud abstractions much more concrete to me. In AWS or GCP, a few clicks hide the boundaries around networks, proxies, services, cron jobs, volumes, secrets, and health checks. Running the same ideas directly with Docker and Linux is more manual, but it makes the infrastructure model much easier to understand.